

How To Find Ip Address On Pioneer Receiver
Please select the product yous would like to control.
・Network Sound Player(N-thirty, North-50)
・Network Audio Thespian(Due north-50A, N-70A, N-P01, XN-P02, XN-P02DAB)
・AV Receiver (VSX-42, VSX-1022, VSX-827, VSX-822, VSX-527)
・AV Receiver (VSX-S510, VSX-43, VSX-1023, VSX-823, VSX-828, VSX-528)
・Blu-ray Disc Player
・CD Receiver (X-HM71, Ten-HM81, XC-HM81)
・CD Receiver (10-HM72, X-HM72D, X-HM82, Ten-HM82D, XC-HM82, Ninety-HM82D)
・Wireless Speaker
・Blu-ray Disc Surround System
・Slim Micro System
・Network AV Speaker Bar System
・Cyberspace RADIO
・Playing music directly from your iPhone/iPod touch, wirelessly
・Common setting page
[ Network Audio Player(Northward-thirty, N-50) ]
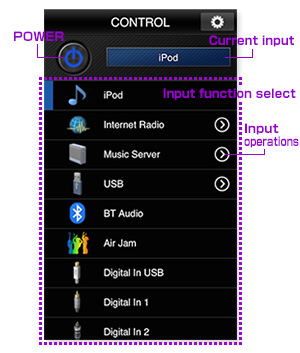
"Command"
1."Power"
When the push is tapped, Power alternates ON/OFF. *i
two."Current input"
Displays the unit's currently selected role.
3."Input part select"
When the various input function icons are tapped, the input function changes.
* The number of input functions differs depending on the model.
4."Input operations"
When the input function is Internet Radio, Music Server or USB, borer these buttons displays the input operation screens.
Control screen
"INPUT Performance"
On this screen yous take access to boosted command of the selected input function.
* Depending on the system software version of the continued Network Sound Actor, some functions may not work. Please visit the Pioneer website for data on how to update your player.
1."List"
Within a list of music files, borer the button will start playback;
when folders are listed, you will access items in that detail folder.
When the total name can non be shown ("..." will appear at the end), tapping and belongings the cell for a few seconds reveals a popular-up with the full name, as illustrated on the correct.
2."UPDATE"
Borer the button volition update the list.
iii."Playback operations panel"
Allows basic playback control.


Listing screen
*Instance when USB is selected

Playback operation screen
*Case when USB is selected
When in the listing screen, attempting to whorl past the available items volition cause the Δ / ∇ keys to appear, allowing y'all to alternate betwixt multiple pages.
Tap the Δ / ∇ buttons to move betwixt pages.
[ Network Sound Player(N-50A, N-70A, N-P01, XN-P02, XN-P02DAB) ]
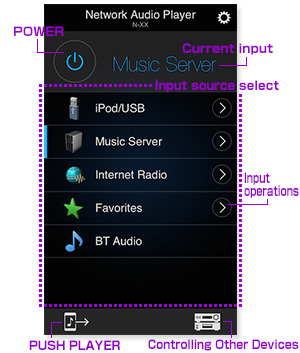
"CONTROL"
1."Power"
When the push button is tapped, Power alternates ON/OFF. *1
2."Current input"
Displays the unit'due south currently selected source.
three."Input Source select"
When the various input source icons are tapped, the input source changes
* The number of input sources differs depending on the model.
four."Input operations"
When the input source is Internet Radio, Music Server or iPod/USB, tapping these buttons displays the input operation screens.
five."Push Histrion"
Borer the marker ![]() accesses the Button Player screen for playing music directly from your iPhone/iPod touch.
accesses the Button Player screen for playing music directly from your iPhone/iPod touch.
See caption of the "Button Actor" folio , click here
6."Controlling Other Devices"
Tap this button to switch to the screen for controlling other devices.
"INPUT Performance"
You can select a list of radio stations and contents, to play from the following Input sources: "Internet Radio", "Music Server", "Favorites", "iPod/USB".
* To run across caption of the "Internet Radio" folio , click here
1."List"
You can play songs or move the layer past tapping.
Yous can add a song or station to "Favorites" by pressing and belongings a vocal or station from the "Internet Radio" and "Music Server" functions.
You can remove a song or station from "Favorites" by pressing and holding the song or station from inside the "Favorites" function.
In addition you lot can add a song or station to "Favorites" from "Playback performance console".

When in the list screen, attempting to scroll past the available items will cause the Δ / ∇ keys to appear, allowing you to alternate between multiple pages.
Tap the Δ / ∇ buttons to move betwixt pages.
2."Return"
Tap this button while on the list screen to get dorsum up one layer in the list.
On the playback screen yous will be returned to the listing screen.
3."Meridian Bill of fare"
Tapping the button causes switching to the playback screen.

Listing screen
* Example when Music Server is selected
4."Search & Sort"
Displayed when operating the server handling search or sort when the input source is "Music Server" and by borer, the menu on the correct appears.
4-1."Searching the entire server"
After selecting the sever, performs searching the entire server.
4-2."Searching the electric current folder and below"
Search is performed on the current folder and beneath.
four-3."Sort"
Switches between the truck order and alphabetical order.

About the search function
The entered search keyword is requested to the server supporting the search role and the search issue notified past the server is displayed in the ControlApp list.
Even though the music is the same, if the same music is registered in each folder configured in the server, the search effect may be displayed in duplicate.
If you lot wish to reduce the duplicated display of the search result, use the Folder search to narrow down the target range of search.
Too, the search function depends on the specifications of each server, it does not hateful that same search result can be obtained from all servers.
5."UPDATE"
Tapping this button will update the list that is displayed.
six."Switching to the playback screen"
Tapping the button causes switching to the playback screen.
7."Playback operations console"
Allows bones playback control.
* The bachelor buttons differ depending on the input selected and the content being played back.
8."Switch to the Spotify App"
Tapping the button will launch/switch to the Spotify App.

playback screen
* Case when Music Server is selected

playback screen
* Case when Spotify is selected
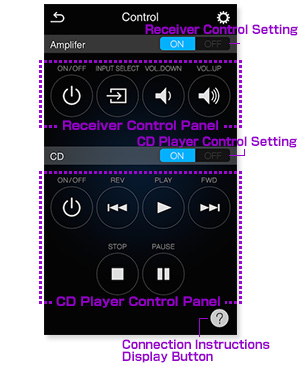
"Controlling Other Devices"
This screen allows you to control a Pioneer receiver / CD player connected to the Network Audio Player'south CONTROL connector.
* In order to control a receiver / CD actor you commencement need to connect it to the Network Audio Player.
Perform the connection following the connexion instructions.
* The following devices can be connected.
[Devices to which the N-50A, Due north-70A tin be connected]
Receiver : A-70, A-50, A-thirty, A-20
CD actor : PD-50, PD-30, PD-D9MK2, PD-D6MK2, PD-D9, PD-D6
[Devices to which the N-P01, XN-P02, XN-P02DAB tin can be connected]
Receiver :SX-P01, SX-P01DAB
CD histrion : PD-P01
![]()
When connected, the remote control point receiver on the receiver or CD player volition cease to role, and the remote control betoken receiver on the Network Audio Thespian volition accept the remote command indicate from the receiver / CD player'south remote command.
Point the remote control at the Network Audio Histrion.
![]()
In order to control the receiver or CD player even while the Network Sound Player is in standby fashion, the Network Audio Actor's Quick Start setting or Network Standby setting must be turned On.
1."Receiver Control Setting"
In club to control the receiver, perform the connection and turn this setting On.
2."Receiver Control Panel"
Perform all control functions for the receiver.
3."CD Player Command Setting"
In order to control the CD player, perform the connection and turn this setting On.
4."CD Player Control Console"
Perform all control functions for the CD thespian.
five."Connection Instructions Display Button"
Tap this push to display instructions for connection to a Pioneer receiver / CD player.
[ AV Receiver (VSX-42, VSX-1022, VSX-827, VSX-822, VSX-527) ]
"CONTROL"
1."POWER"
You tin switch on/off ability of the AV receiver by tapping the button. *2
2."INPUT SELECT"
"INPUT SELECT" folio appears by tapping button. In this page, you can select ane of the input functions.
iii."LISTENING Style"
Change LISTENING MODE by tapping each push.
*Some Listening Modes are non available, depending on the Input selected.
4."VOLUME"
You can suit the AV receiver volume by dragging the "Book" punch.
5."MUTE"
You tin can mute the sound by tapping the button.

Control screen
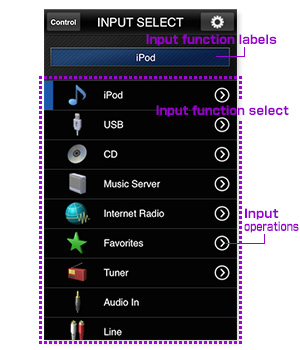
"INPUT SELECT"
1.Current input
Displays the unit'southward currently selected function.
2.Input part select
When the various input function icons are tapped, the input role changes.
The number of input functions differs depending on the model.
three.Input operations
When in that location is a marker![]() next to the name of the input function, tapping the mark
next to the name of the input function, tapping the mark![]() , gives admission to the List screen, and Input operation screen.
, gives admission to the List screen, and Input operation screen.

Input select screen

List screen
* Instance when iPod/USB is selected

Input functioning screen
* Case when iPod/USB is selected
When in the list screen, attempting to ringlet past the available items volition cause the Δ / ∇ keys to appear, allowing you lot to alternate between multiple pages.
Tap the Δ / ∇ buttons to move between pages.
[ AV Receiver (VSX-S510, VSX-43, VSX-1023, VSX-823, VSX-828, VSX-528) ]
"Control"
1."Power"
Yous can switch on/off power of the AV receiver by tapping the button. *2
two."INPUT SELECT"
"INPUT SELECT" folio appears by tapping button. On this page, you tin can select i of the input functions.
iii."LISTENING Mode"
Change LISTENING MODE by tapping each button.
*Some Listening Modes are not available, depending on the Input selected.
4."VOLUME"
You tin can adjust the AV receiver volume by dragging the "Book" dial.
5."MUTE"
You can mute the sound by borer the button.

Control screen
"INPUT SELECT"
one.Current input
Displays the unit of measurement's currently selected function.
ii.Input function select
When the various input function icons are tapped, the input function changes.
The number of input functions differs depending on the model.
3.Input operations
When there is a mark![]() next to the proper name of the input office, tapping the marker
next to the proper name of the input office, tapping the marker![]() gives admission to the Listing screen, and Input operation screen.
gives admission to the Listing screen, and Input operation screen.
* If you desire to listen to Spotify on your Pioneer AV Receiver, y'all have to open the "Spotify App".
* Spotify function does not work in areas where the Spotify service is not available.
4."Push Role player"
Tapping the marker![]() accesses the PUSH Player screen for playing music directly from your iPhone/iPod touch.
accesses the PUSH Player screen for playing music directly from your iPhone/iPod touch.
Run across explanation of the "Push button Histrion" page , click here)

Input select screen
INPUT OPERATIONS
You tin can select a list of radio stations and contents, to play from the following Input functions: "INTERNET RADIO", "MEDIA SERVER", "FAVORITES", "iPod/USB", "PANDORA".
You tin select the preset station that you accept pre-registered in the "TUNER" role.
* The blazon and number of the function depends on the model.
1."LIST"
You can play songs or move the layer past tapping.
You can add a song or station to "FAVORITES" by pressing and holding a song or station from the "INTERNET RADIO" and "MEDIA SERVER" functions.
You lot can remove a song or station from "FAVORITES" past pressing and belongings the vocal or station from within the "FAVORITES" part.
2."UPDATE"
Tapping the button will update the display list.
3."Playback operations panel"
Allows bones playback control.
Bachelor playback options depend on the Input role selected.
iv."Switch to the Spotify App"
Tapping the push button will launch/switch to the Spotify App.


List screen
* Example when MEDIA SERVER is selected

Input operation screen
* Example when MEDIA SERVER is selected

Input operation screen
* Example when Spotify is selected
When in the list screen, attempting to scroll past the bachelor items will cause the Δ / ∇ keys to appear, allowing you to alternate betwixt multiple pages.
Tap the Δ / ∇ buttons to motility betwixt pages.
[ Blu-ray Disc Player ]
i."Ability"
You can switch the power of the Blu-ray Disc player on/off by tapping the push. *3
2."Command Console"
You lot can command the bones performance of the Blu-ray Disc player, such as "play", "interruption", "stop", "forrard", etc. *4
3."Functioning Fashion"
You can select the operation fashion.
* You can select the "basic operation style" by tapping![]() button.
button.
* You can select the"Cantankerous" interface by tapping![]() button.
button.
four."Cross"
You can move cursor past flicking up/downward/left/right.
Tap activity ways "ENTER".

Basic opration mode

Cross
[ CD Receiver (X-HM71, X-HM81, XC-HM81) ]
"CONTROL"
i."Ability"
You tin can switch on/off("NET STANDBY") power of the CD receiver past tapping the button. *5
When Network standby is turned on, "Cyberspace STANDBY" will announced beside the ability push.

2."INPUT SELECT"
"INPUT SELECT"page appears by tapping push button. In this page, yous can select the input office by tapping input function table.
3."VOLUME"
You lot tin adjust the CD receiver volume by dragging the "VOLUME" dial.
4."MUTE"
Yous can mute the sound by tapping the button.

Command screen
"INPUT SELECT"
one.Input function labels
Displays the unit's currently selected function.
2.Input function select
When the various input role icons are tapped, the input function changes.
The number of input functions differs depending on the model.
3.Input operations
When at that place is a marking![]() next to the name of the input function, tapping the mark
next to the name of the input function, tapping the mark![]() , gives access to the List screen, and Input functioning screen.
, gives access to the List screen, and Input functioning screen.
4.UPDATE
Tapping the push button will update the display listing.
Input select screen

Listing screen
*Example when USB is selected

Input functioning screen
*Example when USB is selected
When in the list screen, attempting to curl by the bachelor items will cause the Δ / ∇ keys to appear, allowing you to alternate between multiple pages.
Tap the Δ / ∇ buttons to motility between pages.
【CD Receiver (X-HM72, X-HM72D, X-HM82, Ten-HM82D, Ninety-HM82, 90-HM82D) 】
"Control"
1."Power"
You tin switch on/off power of the CD receiver by tapping the push. *6
2."INPUT SELECT"
"INPUT SELECT" page appears by borer push button. In this page, y'all can select the input source by tapping input source tabular array.
iii."Volume"
You lot can adjust the CD receiver book by dragging the "Book" dial.
4."MUTE"
You can mute the sound by borer the button.
5."P.BASS"
When the button is tapped, "P.BASS" switches ON/OFF.
6."Audio"
When the push button is tapped, "Blaster way" alter to a unlike manner.
7."Sleep"
The slumber timer switches the CD receiver into standby after a specified amount of fourth dimension so you can fall asleep without worrying about the CD receiver existence left on all nighttime.

"INPUT SELECT"
one."Current input"
Displays the unit'southward currently selected source.
2."Input source select"
When the various input source icons are tapped, the input source changes.
3."Input operations"
When there is a marking![]() next to the name of the input source, tapping the mark
next to the name of the input source, tapping the mark![]() , gives admission to the Listing screen, and Input operation screen.
, gives admission to the Listing screen, and Input operation screen.
4."Push Role player"
Borer the mark ![]() accesses the PUSH Histrion screen for playing music directly from your iPhone/iPod affect.
accesses the PUSH Histrion screen for playing music directly from your iPhone/iPod affect.
Come across explanation of the "Button PLAYER" page , click here

INPUT OPERATIONS("iPod/USB", "CD", "Music Server", "Internet Radio", "Favorites")
You can select a list of radio stations and contents to play from the following Input sources : "iPod/USB", "Music Server", "Internet Radio", "Favorites"
* To see explanation of the "Internet Radio" folio , click hither
i."List"
Y'all can play songs or move the layer by tapping.
You lot can add a song or station to "Favorites" by pressing and holding a song or station from the "Internet Radio" and "Media Server" functions.
You can remove a song or station from "Favorites" by pressing and belongings the song or station from within the "Favorites" function.
In addition you can add a song or station to "Favorites" from "Playback operation panel".
When in the list screen, attempting to coil past the bachelor items will crusade the Δ / ∇ keys to appear, allowing you to alternating between multiple pages.
Tap the Δ / ∇ buttons to motility between pages.
2."Return"
Tap this button while on the list screen to go back up one layer in the list.
On the playback screen y'all will exist returned to the list screen.
iii."TOP MENU"
Tapping the button causes switching to the playback screen.

List screen
* Example when Music Server is selected
four."Search & Sort"
Displayed when operating the server handling search or sort when the input source is "Music Server" and past tapping, the menu on the correct appears.
4-one."Searching the unabridged server"
After selecting the sever, performs searching the entire server.
4-two."Searching the electric current folder and below"
Search is performed on the current folder and below.
four-3."Sort"
Switches between the truck guild and alphabetical gild.
Nearly the search function
The entered search keyword is requested to the server supporting the search role and the search result notified by the server is displayed in the ControlApp list.
Even though the music is the same, if the aforementioned music is registered in each folder configured in the server, the search result may be displayed in indistinguishable.
If y'all wish to reduce the duplicated brandish of the search result, use the Folder search to narrow downwardly the target range of search.
Too, the search function depends on the specifications of each server, it does not hateful that same search result can be obtained from all servers.
v."UPDATE"
Tapping the button will update the display listing.
vi."Switching to the playback screen"
Tapping the button causes switching to the playback screen.
7."Playback operations panel"
Allows basic playback control.
* The available buttons differ depending on the input selected and the content being played back.
8."Switch to the Spotify App"
Tapping the button will launch/switch to the Spotify App.

playback screen
* Example when Music Server is selected

playback screen
* Instance when Spotify is selected

playback screen
* Instance when Spotify is selected
INPUT OPERATIONS("Tuner")
1."Preset station listing"
Yous can select the preset station that you lot take pre-registered

INPUT OPERATIONS("DAB")
ane."Station"
You can select the station for DAB.
two."Station Surfing"
Receivable broadcasting station is played for a short fourth dimension , and changed to the adjacent dissemination station automatically.
* Play time is inverse depending on environment.

[ Wireless Speaker ]
"CONTROL"
* In order to apply ControlApp, you may need to update your Wireless Speaker's firmware.
Click hither for the Wireless Speaker operating.
1."Internet Radio"
Tapping this button switches to Cyberspace Radio.
* Borer "Net Radio" while on standby when Wireless Speaker is in "Quick Kickoff Way" turns on the Wireless Speaker, and office changes to "Internet Radio"
2."Pandora"
Tapping this button switches to Pandora.
* Pandora is just available in the U.s.a..
* Tapping "Pandora" while on standby when Wireless Speaker is in "Quick First Style" turns on the Wireless Speaker, and role changes to "Pandora".
3."Spotify"
If yous want to listen to Spotify, you can switch to the Spotify command screen past tapping this button.
* In order to play Spotify you lot must open the "Spotify App".
* Spotify can only exist accessed in countries where information technology is officially available.
* Tapping the "Spotify" push when quick start has been enabled on the Wireless Speaker will power on the Wireless Speaker automatically.
4."Volume"
You can adapt the Wireless Speaker volume by dragging the "Volume" punch.
5."MUTE"
Tap to mute sound.
half dozen."Push button PLAYER"
Borer the mark![]() accesses the PUSH Player screen for playing music straight from your iPhone/iPod bear on.
accesses the PUSH Player screen for playing music straight from your iPhone/iPod bear on.
(To encounter explanation of the "PUSH Thespian" page , click hither)

Command screen
"Internet Radio/Pandora"
ane."Render"
Returns to the previous screen.
2."UPDATE"
Tap to update the list.

List screen
When in the listing screen, attempting to curl past the available items volition crusade the Δ / ∇ keys to appear, assuasive you lot to alternate between multiple pages.
Tap the Δ / ∇ buttons to movement between pages.
3.Playback operations panel
Allows basic playback control.

Playback performance screen
* When "Net Radio" is selected

Playback operation screen
* When "Pandora" is selected
4."Switch to the Spotify App"
Tapping the button will switch to the Spotify App.

Playback performance screen
* When "Spotify" is selected
[ Blu-ray Disc Surround System ]
"CONTROL"
1."POWER"
Yous can switch the power of the Blu-ray Disc Surround Arrangement on/off by tapping the push. *seven
2."VOLUME"
You tin can adjust the volume of the Blu-ray Disc Surroundings Arrangement past dragging the "Volume" dial.
iii."MUTE"
You tin can mute the sound past borer the button.
4."Electric current input"
Displays the unit's currently selected function.
* Displays "Dics/Web/HMG" on top, while playing discs, Web contents or during playback from Home Media Gallery.

"CURSOR"
1."Cross"
You lot tin can motility the cursor by flicking upward/down/left/right.
Tap action means "ENTER".

"PLAYBACK OPERATIONS"
1."Control Panel"
You can operate playback functions.
* Some buttons / functions may not utilize depending on the source being played.

"SOURCE MENU"
1." Source selection Carte du jour"
When the various source icons are tapped, the source changes.
The number of sources bachelor depends on the model.
2." Source operations"
tap abreast FM Tuner and you volition leap to "FM Tuner" screen. tap
 abreast iPod and you will jump to "PLAYBACK OPERATIONS".


"SOURCE Bill of fare"
1."STEREO/MONO"
When the button is pressed, the sound switches between STEREO and MONO. In a poor reception area, select MONO for clear, inter-ference-costless broadcast.
2."Manual tuning"
You lot can tune in by manual aligning.
* verify the frequency at the front panel display window.
3."Automatic tuning"
Printing -/+ to automatically search the band.
4."Preset"
You can select the stored stations by pressing -/+.

[ Slim Micro System ]
"CONTROL"
1."Ability"
You tin can switch on/off power of the Slim Micro System by tapping the button. *8
2."INPUT SELECT"
"INPUT SELECT" page appears by borer button. In this folio, you can select 1 of the input functions.
3."VOLUME"
You tin accommodate the Slim Micro System volume by dragging the "VOLUME" dial.
four."MUTE"
Yous tin mute the sound past tapping the push button.
5."P.BASS"
When the push is tapped, "P.BASS" switches ON/OFF.
6."EQUALIZER"
When the button is tapped, "Blaster mode" alter to a different mode.

Control screen
"INPUT SELECT"
1.Current input
Displays the unit's currently selected function.
ii.Input function select
When the various input role icons are tapped, the input office changes.
The number of input functions differs depending on the model.
three.Input operations
When there is a mark![]() next to the proper noun of the input office, tapping the mark
next to the proper noun of the input office, tapping the mark![]() gives access to the List screen, and Input functioning screen.
gives access to the List screen, and Input functioning screen.
* If you desire to listen to Spotify on your Pioneer device, you lot take to open up the "Spotify App".
* Spotify can simply be accessed in countries where it is officially bachelor.
iv."PUSH Role player"
Tapping the mark accesses the PUSH Actor screen for playing music directly from your iPhone/iPod touch.
(See caption of the "Push button Player" page , click here)

Input select screen
INPUT OPERATIONS("Internet Radio", "Music Server", "Favorites", "iPod", "USB", "CD")
You can select a list of radio stations and contents to play from the following Input functions : "Internet Radio", "Music Server", "Favorites", "USB( for iPod/iPhone/iPad)", "iPod"
You can operate only basic operations such every bit "play or stop" in functions of "CD", "USB(USB Memorry)".
* In the USB function, your operation are differentiated in some cases.
・iPod/iPhone/iPad via USB : Y'all can operate "List" & "Playback operations panel".
・USB Memorry via USB : Y'all tin operate only "Playback operations panel".
* To see caption of the "Cyberspace RADIO" page , click here
1."Listing"
Y'all tin play songs or move the layer by borer
You tin add a song or station to "Favorites" past pressing and property a song or station from the "Internet Radio" and "Media Server" functions.
You tin can remove a song or station from "Favorites" past pressing and holding the vocal or station from within the "Favorites" office.
In addition yous tin can add a song or station to "Favorites" from "Playback performance panel".
2."UPDATE"
Tapping the push will update the brandish listing.
3."Playback operations panel"
Allows basic playback command.
Available playback options depend on the Input part selected.
4."Switch to the Spotify App"
Tapping the button will switch to the Spotify App.

List screen
* When "Music Server" is selected

Playback operation screen
* When "Music Server" is selected

Playback functioning screen
* When "Spotify" is selected

Playback operation screen
When in the list screen, attempting to scroll past the available items volition cause the Δ / ∇ keys to announced, assuasive you to alternating between multiple pages.
Tap the Δ / ∇ buttons to move between pages.
INPUT OPERATIONS("TUNER", "DAB")
1."Manual Tuning"
You tin melody in by manual adjustment.
* verify the frequency at the front panel display window.
2."Automated Tuning"
Scanning will beginning automatically and the tuner will stop at the first receivable broadcast station.
3."Preset"
You can select the stored stations by pressing -/+.
iv."Station"
You lot can select the station for DAB.
v."Memory"
You can store the playing station in retentivity.
* Can not store the station, if preset memory is full.
* Can not erase preset channel from Control App.
If yous want to erase preset a channel, you must utilize the remote controller.
6."STEREO/MONO"
When the button is pressed, the sound switches between STEREO and MONO. In a poor reception surface area, select MONO for clear, inter-ference-gratis broadcast.
7."Station Surfing"
Receivable dissemination station is played for a short time, and changed to the side by side broadcasting station automatically.
* Play time is changed depending on environment.

TUNER

DAB
[ Network AV Speaker Bar Organisation ]
"Command"
ane."Power"
Y'all can power on/off power of the Network AV Speaker Bar System by tapping the button. *ix
2."Book"
You can suit the book of the Network AV Speaker Bar System by dragging the "VOLUME" dial.
3."Subwoofer Volume"
Yous can adjust the volume balance between the subwoofer and speakers by dragging the "Subwoofer Volume" punch.
four."MUTE"
You can mute the sound by tapping the button.

v."Electric current input"
Displays the unit of measurement's currently selected function.
"CURSOR"
1."Cross"
You tin can move the cursor by flicking up/down/left/right.
Tap action ways "ENTER".
2."Sound Menu"
Switch to the sound menu screen, you lot can change
various audio settings.

"PLAYBACK OPERATIONS"
1."Control Panel"
You lot tin operate playback functions.
* Some buttons / functions may not utilise depending on the source existence played.

"SOURCE MENU"
ane."Source choice Carte"
When the various source icons are tapped, the source changes.
The number of sources available depends on the model.
2."Source operations"
When you tap![]() marking next to BT Audio,
marking next to BT Audio,
It will switch to the screen that displays the connexion status of the Bluetooth device and network AV Speaker Bar Arrangement.
tap![]() beside iPod and you will bound to "CURSOR".
beside iPod and you will bound to "CURSOR".
When you tap![]() marker next to YouTube, you lot can switch to the YouTube app.
marker next to YouTube, you lot can switch to the YouTube app.
* This system support the "YouTube Send to TV". If You can select video content from YouTube app ,You can sentry on the Telly via "AV network system bar".
(You lot will demand to specify a destination on YouTube app.)

[ Net RADIO ]
The listing of Internet Radio stations provided with the unit of measurement is based on the radio station database service vTuner.
This database service is edited and compiled for utilize with the unit.
The unit can exist used to annals and play programmed material from stations not found on lists distributed past vTuner.
To exercise this, ostend the admission code necessary to register the unit, and use that lawmaking to access the dedicated Pioneer internet radio site;
through information technology, you can annals your favorite stations. The URL for the dedicated Pioneer Cyberspace Radio site is http://www.radio-pioneer.com.
1. Display the top level screen of the Internet Radio list.
2. Tap on "Aid".
three. Tap on "Get access lawmaking".
The screen volition display the access lawmaking necessary to register stations on the dedicated Pioneer Internet Radio site; record that access code on piece of paper.
The Help screen allows you to confirm the following items:
・Get access code : Displays access code necessary to register on the dedicated Pioneer Net Radio site.
・Show Your WebID/PW : After registering on the dedicated Pioneer Internet Radio site, your registration ID and password will be displayed.
・Reset Your WebID/Pw : Resets all registration information on the dedicated Pioneer Cyberspace Radio site. When this is reset, whatsoever broadcast stations you have registered at that place will as well be erased, and so if you wish to continue to listen to any sites you previously registerd, re-register them after performing the reset.
4. Accessing the dedicated Pioneer Internet Radio site from your reckoner.
http://www.radio-pioneer.com
Use the above URL to admission the site.
five. To modify the site's language, choose the applicable land flag on the first page of this website.
vi. Read the disclaimer and if in agreement, click on "Accept".
7. Use the access code noted in stride 3 to perform user registration according to the instructions on the screen.
8. Follow the instrucions on the screen to register your favorite stations.
Here, you lot can annals both stations not on the vTuner listing, and stations on the list likewise. In this case, the stations will be recorded on the unit as favorite stations, assuasive you to play them easily.
[ Playing music directly from your iPhone/iPod touch on, wirelessly ]
"Push button Role player" screen
This screen is used when playing music files stored in your iPhone/iPod bear upon.
AirPlay is used to output audio to this unit of measurement.
ane."Music Laibrary"
Music file on iPhone/iPot touch will be displayed.
Tap a track name on the list to start playback.
2."Playback operation screen"
Allows playback control.
3."Now playing list"
Displays the list currently being played.
4."Audio output"
Tap this button to display a list of currently connected AirPlay devices Select ayour AV reciever from the Sound output list and music will play to it.
* If no connected AirPlay devices are found, the![]() volition not appear.
volition not appear.
* The Audio output screen will display all devices compatible with AirPlay in your network environment.

Music Laibrary

Playback functioning screen

Now playing list
[ Common ]
Settings menu
Tap on the ![]() button at the top right of any folio to change to the settings carte:
button at the top right of any folio to change to the settings carte:

Displays a listing of devices that have previously been controlled past ControlApp.
If other devices have been connected by ControlApp,"modify device button" is displayed when you tap a setting push.
It will keep to exist displayed during that tap the Settings button.
Go along pressing the "settings button", then slide finger to the "change device button " which appears on the left of the settings icon, a listing of devices which Control App has e'er continued with volition exist displayed.
When y'all select the device you want to operate from the listing, and it connects, the screen will change.
* "Alter devices button" will continue to be displayed when the Settings button is tapped.
* The "modify device button " displays as long as you keep pressing the "settings push".
When y'all stop pressing the "settings button", "settings screen" will be displayed.
* If you have more than one of the same product, please switch to the continued device from the control target device list by selecting the device from the settings screen.
* Devices that have non been operated past ControlApp practise not appear in the list.
If yous desire to operate by ControlAPP for the offset time,you lot select the devices from the selection screen, please connect from the control target device list.
1.Select device
From this folio, y'all can retrieve and connect to the target device.
This folio will be utilized when you desire to add products to be controlled, or when the connectedness procedure failed during the offset-upward of ControlApp.
1-1.Listing of compatible products
This is a list of equipment that can exist controlled by ControlApp. Y'all tin select the device you desire to control. Go to the 2d screen to select a device that volition exist connected for the outset time. Yous can connect past tapping the target model. (A blue bar is displayed to the left of the model proper noun when the connection is completed)
1-ii.Avant-garde settings
Tap to brandish advanced setting information.
1-three.UPDATE push
When the UPDATE push button is tapped, a search is performed for controllable devices on your network; if found, the devices are displayed by proper noun. Tap on the device name to select information technology.
one-iv.IP address
A device search tin be performed not merely by the UPDATE button; a device tin too be connected past inputting its IP address. When IP Address is tapped, the screen changes to display the IP Address input menu. Input the device's IP address and tap the SEARCH button.
* For information on how to confirm a device's IP address consult the device's Operating Instructions.
ii.DEMO Way
Alternately turns the DEMO Manner ON/OFF. When the DEMO mode is selected, the ControlApp can be operated without connecting the device.
iii.Region select
Select your region of residence, or the nearest ane to it.
This particular is unremarkably gear up automatically and requires no change.
4.Version information
Displays the version number of the Pioneer ControlApp.

Select device screen1

Select device screen2
(*one) On a Pioneer Network Audio Thespian power ON command only works when "Quick start" mode or "Network standby" mode is enabled.
(*2) On a Pioneer AV receiver power ON command just works when "Network Standby" way is enabled.
(*3) On a Pioneer Blu-ray Disc histrion power ON command only works when "Quick Start" manner is enabled.
(*4) There are some Blu-ray Disc player functions you cannot operate from this page.
(*5) Switching off the power using ControlApp puts the CD receiver into network standby mode only. To plow the product off, press the product's power button.
(*vi) On a CD receiver power ON control simply works when "Quick starting time" fashion is enabled.
(*7) On a Pioneer Blu-ray Disc Environment System ability ON control only works when "Quick Start" fashion is enabled.
(*8) On a Slim Micro Organisation power ON control but works when "Quick Outset Mode" is enabled.
(*9) On a Network AV Speaker Bar Organization power ON control simply works when "Awarding Standby Mode" is enabled.

How To Find Ip Address On Pioneer Receiver,
Source: https://jp.pioneer-audiovisual.com/support/soft/iapp_controlapp/en.html
Posted by: griffiththerret99.blogspot.com
0 Response to "How To Find Ip Address On Pioneer Receiver"
Post a Comment